PRINTER SETTINGS
Condition Settings
Printer condition settings are described below.
Prohibit Notice Page Printing
Disables to print a notice page.Prohibit Test Page Printing
Disables to print the test page.If this setting is enabled, [System Settings] → [List Print (User)] → [Printer Test Page] in "Setting mode" cannot be used to print test pages.
A4/Letter Size Auto Change
When printing an 8-1/2" × 11" (letter) size image, this setting allows A4 size paper to be used if 8-1/2" × 11" size paper is not loaded.Print Density Level
This lightens or darkens the print density of images. The print density can be adjusted to five levels.Bypass Tray Settings
This is displayed only when a bypass tray is installed.| Item | Description |
|---|---|
| Enable Detected Paper Size in Bypass Tray | This is used to prohibit printing when the paper size specified for a print job is different from the paper size inserted in the bypass tray. |
| Enable Selected Paper Type in Bypass Tray | This is used to prohibit printing when the paper size specified for a print job is different from the paper size inserted in the bypass tray. |
| Exclude Bypass-Tray from Auto Paper Select | When [Auto] is selected for paper type selection, the bypass tray is excluded from the trays that can be selected. This is recommended when special paper is often placed in the bypass tray. |
Job Spool Queuing
When this function is enabled, received print jobs are displayed in the spool queue of the job status screen. The jobs are moved to the job queue after they have been analyzed by the machine. Multiple jobs that have not yet been analyzed appear in the spool queue.When this function is disabled, received print jobs are displayed in the job queue instead of being displayed in the spool queue. However, when an encrypted PDF job is printed, the job appears in the spool queue.
Disabling of USB Memory Direct Print
Disables the function for directly printing of a file on a USB memory device.Disabling of Network Folder Direct Print
Disables direct printing from a network folder.Disabling sending while printing
Disables the Image Send function during printing.Interface Settings
These settings are used to control and monitor data transmitted to the USB port or network port of the machine.
Hexadecimal Dump Mode
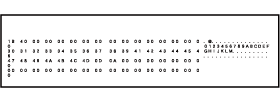
This function is used to print the print data from a computer in hexadecimal format together with the corresponding ASCII text. "Hexadecimal Dump Mode" allows you to check whether or not print data from the PC is being transmitted to the printer correctly.Example of a hexadecimal dump:

I/O Timeout
The I/O timeout can be set to any number of seconds from 1 to 999.The I/O timeout function temporarily breaks the connection if the set duration of time elapses without any data being received by the port. After the connection is broken, the port is set to auto selection or the next print job is begun.
Enable USB Port
Enables printing from the USB port.USB Port Emulation Switching
If the machine is connected using the USB port, select the emulated printer language.The following settings can be configured.
- Auto
- Post Script
- PCL

- The settings are the same as those of "Network Port Emulation Switching".
- Unless printer errors occur frequently, it is recommended that you use the factory default setting "Auto".
Enable Network Port
Enables printing from the network port.Network Port Emulation Switching
This setting is used to select the emulated printer language when the machine is connected by a network port.The following settings can be configured.
- Auto
- Post Script
- PCL

- The settings are the same as those of "USB Port Emulation Switching".
- Unless printer errors occur frequently, it is recommended that you use the factory default setting "Auto".
Port Switching Method
Selects when port switching takes place.| Item | Description |
|---|---|
| Switch at End of Job | The port changes to auto selection when printing ends. |
| Switch after I/O Timeout | When the time set by "I/O Timeout" elapses, the port changes to Auto Selection. |
 The following two print ports are available on the machine:
- USB port
- Network port
Auto Calibration
Corrects gradation if it is off. When the machine scans a printed test patch, the gradation is automatically corrected.
After the [Execute] key is tapped and a test patch is printed, a message appears prompting you to begin automatic calibration.
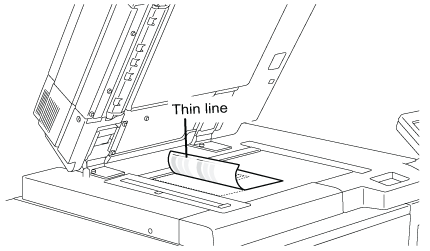
Place the test patch on the document glass as shown below (so that the thin line at the edge of the page is to the left).
After the [Execute] key is tapped and a test patch is printed, a message appears prompting you to begin automatic calibration.
Place the test patch on the document glass as shown below (so that the thin line at the edge of the page is to the left).

Lay copy paper (about five sheets) that is the same size as the test patch on top of the placed test patch, gently close the automatic document feeder, and tap the [Execute] key.
 If the gradation is still off after performing Auto Calibration, repeating the Auto Calibration procedure again may improve the gradation.