SAVING SCANNED ORIGINAL DATA (QUICK FILE)
Overview
If you specify Quick File for image transmission, the scanned original data is saved as a file in the Quick File folder. As you can recall the stored file when required, you can retransmit the file without preparing its original.
 When a file is stored using Quick File, the user and file are automatically named as follows.
 User Name: User Unknown
File Name: Mode_Month-Day-Year_Hour-Minute-Second-AM
(Example: E-mail_FTP_04042011_112030AM)
Stored to: Quick File folder
When user authentication is used, the user name that was used for login is automatically selected. If data is stored with the Quick File option, you can change the file name and the storage location only.

To delete all files in the Quick File folder with the exception of protected files:
In "Setting mode (administrator)", select [System Settings] → [Document Filing Settings] → [Delete All Quick Files]. Configure settings to have all files deleted when the power is turned on as required.Operation

Place the original
Place the original in the automatic document feeder or on the document glass.
Specify the destination

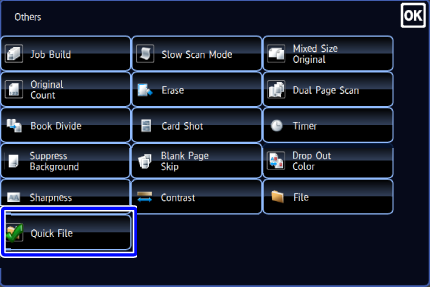
Tap the [Others] key, and tap the [Quick File] key
When you check the on-screen message and tap [OK], the icon is checked.After the settings are completed, tap and [Back] keys in sequence.
 You can also set the Quick File option by tapping the [Quick File] key on the Action Panel.
To cancel the Quick File setting:
Tap the [Quick File] key to clear the checkmark.
Tap the [Start] key to start scanning of the original
If you inserted the original pages in the document feeder tray, all pages are scanned.
When you place the original on the document glass, scan each page one at a time.
After you have scanned the last original, tap the [Read-End] key.
A beep will sound to indicate that scanning and transmission have ended. Tap the [Preview] key to preview the output image before sending it. After you have scanned an original by tapping the [Preview] key, tap the [Additional Scan] key to scan the next original. Tap the [Start] key to start sending an image.