INSERTING SEPARATOR PAGES BETWEEN COPIES OR JOBS
Overview
This function inserts separator pages for every specified number of copies or for every job before they are output.
When you insert separator pages between a certain number of copies, you can specify whether to insert a separator page before or after each stack. You can also specify the number of copies you want to insert a separator page before or after. When you insert separator pages between jobs, you can specify whether to insert a separator page before or after each job.
When you insert separator pages between a certain number of copies, you can specify whether to insert a separator page before or after each stack. You can also specify the number of copies you want to insert a separator page before or after. When you insert separator pages between jobs, you can specify whether to insert a separator page before or after each job.
Separator page insertion examples
In the following examples, four copies of a two-page original are output.

Inserting a separator page before every two copies

Inserting a separator page after every two copies

Inserting separator pages before and after a job


- A finisher, saddle finisher or high capacity stacker is required to use the Separator Page function.
- Even when this function is enabled, the Sort/Group, Staple, Punch, Z-Fold, and Half Fold functions are not applied to separator pages.
- The Offset function, if enabled, is also applied to separator pages.
Operation

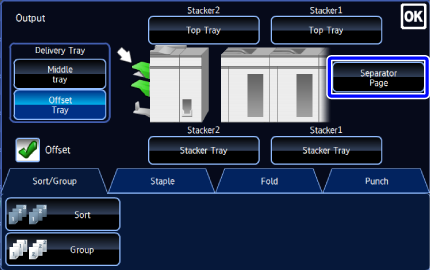
Tap the [Output] key

Tap the [Separator Page] key


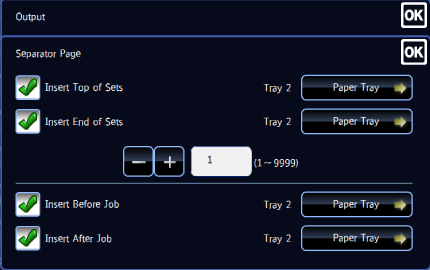
Specify the separator page insertion mode
- To insert separator pages between copies, set the [Insert Top of Sets] or [Insert End of Sets] checkbox to
 . Then, tap
  to specify the number of copies you want to insert a separator page before or after.
 - To insert separator pages between jobs, set the [Insert Before Job] or [Insert After Job] checkbox to
 .
. - After the settings are completed, tap
 .
.


To change the separator page tray:
Tap the [Paper Tray] key to display the tray selection screen. Tap the separator page in the tray selection screen.
For more information, see "SETTING THE PAPER TRAY" and "SETTING THE BYPASS TRAY".
To cancel the separator page insertion setting:
Clear the checkmark for the separator page insertion mode.- To insert separator pages between copies, set the [Insert Top of Sets] or [Insert End of Sets] checkbox to