BASIC PRINTING
Overview
This section explains how to print a document from "WordPad", which is a standard accessory application in Windows.
Operation

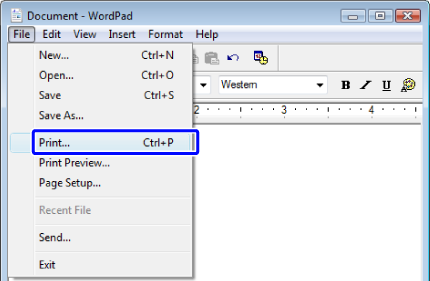
Select [Print] from the [File] menu of WordPad

- The menu used to execute printing may vary depending on the application such as [Print].
- The button that is used to open the printer driver properties window (usually [Property] or [Print Preferences]) may vary depending on the application.
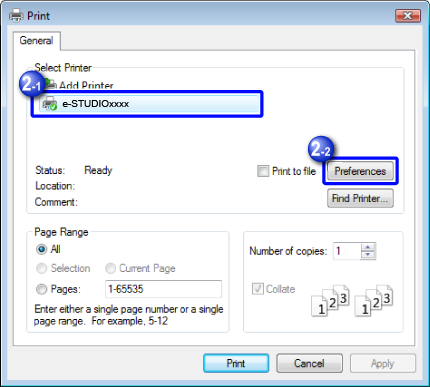
- The machine name that normally appears in the [Printer] menu is [e-STUDIOxxxx]. ("xxxx" is a sequence of characters that varies depending on the machine model.)

 In Windows 7/8/Server 2012, click
  .
.
Select the printer driver for the machine and click the [Preferences] button
If the printer drivers appear as a list, select the name of the printer driver to be used from the list.

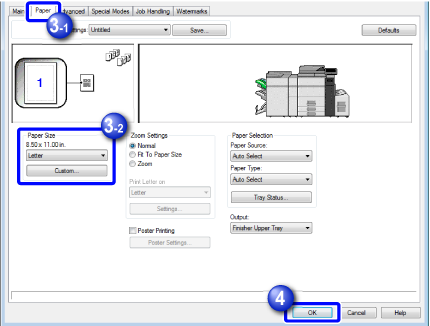
Click the [Paper] tab and select the paper size
Make sure the paper size is the same as the paper size set in the application.

- Up to eight desired paper sizes can be registered. Select [Custom Paper] or one of [User1] to [User7] from the pull-down menu and click the [Custom] button.
It is convenient to register particular paper sizes that are frequently used. - To select settings in other tabs, click the desired tab and then select the settings.
- Up to eight desired paper sizes can be registered. Select [Custom Paper] or one of [User1] to [User7] from the pull-down menu and click the [Custom] button.

Click the [OK] button to start printing