DIRECTLY PRINTING A FILE IN AN FTP SERVER
Overview
If you register an FTP server, you can specify a file in the FTP server from the touch panel on the machine. This saves you the trouble of downloading the file and printing it from the computer.
 When you select a password-protected PDF file, you must enter the password in the job status screen.
 To register an FTP Server:
In "Setting mode (administrator)", select [Application Settings] → [Setting for Print from the MFP(FTP)]. Up to 20 FTP servers can be registered.Operation

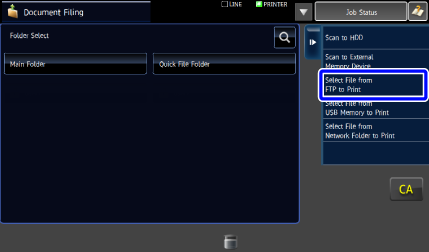
Tap the [HDD File retrieve] key

Tap the [Select File from FTP to Print] key on the action panel

Tap the FTP server you wish to access
Some server may require you to enter the user name and password.
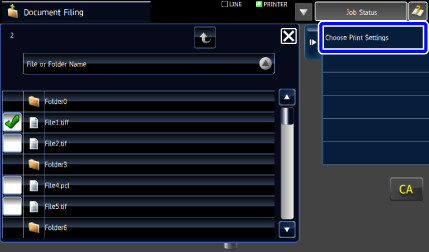
Tap the file that you wish to print, and tap the [Choose Print Settings] key on the action panel
- When printing multiple files, tap all the files you wish to print, and tap the [Print] key on the action panel.
- The checkboxes of the selected files are selected.
- The
 icon appears to the left of the keys of files that can be printed.
 - The
 icon is displayed to the left of the keys of folders in the FTP server. To display a folder or a file in a folder, tap this key.
- A total of 100 keys of files and folders can be displayed.
- Tap
_S.png) to move up one folder level.
to move up one folder level. - When you move down a folder level by tapping a folder key,
.png) appears.
appears.
Tap this key to return to the file or folder name selection screen. - Tap the [File or Folder Name] key to change the order of the files and folders displayed on the screen. Each time the key is tapped, the order changes between ascending and descending.

Select the print conditions
- If you have selected multiple files in step 4, you can only select the number of prints.
- If you have selected a file that includes print conditions (i.e., PCL, PS, or XPS files) in step 4, the settings will be applied.
When the [Print Glossy] checkbox is selected, [Paper Area] is set to [Glossy Paper] (bypass tray) and [Resolution] is set to [600 dpi (High Quality)].
Tap the [Start] key
Printing begins after the selected file is downloaded.